Honey Cream Puffs

Honey Cream Puffs

This treat has lovely contrasting textures - starting with the crisp, golden pate a choux that’s filled with silky, creamy honey pastry cream. In this recipe, I’m using Wholesome Organic Fair Trade Raw & Unfiltered Honey inside both the puffs and the delicious pastry cream used to fill them. I love this pure multifloral honey and the beautiful color and sweetness it contributes to my recipes! These cream puffs look super fancy, but are surprisingly simple to make, and make a sweet baking project that’s fun to serve - or even to gift! #AllTheBest from my kitchen and Wholesome! 

This recipe was created in partnership with Wholesome

Makes 9 large puffs

Honey Pastry Cream Filling

1 ½ cups (175 g) whole milk

1/3 cup (28 g) cornstarch

1/2 cup (113 g) Wholesome Organic Fair Trade Raw + Unfiltered Organic Honey

¾ teaspoon (3 g) fine sea salt

6 large (130 g) egg yolks

2 tablespoons (28 g) unsalted butter

2 teaspoons (10 g) vanilla extract or 1 teaspoon (5 g) vanilla bean paste

Cream Puffs

½ cup (115 grams) water

½ cup (115 grams) whole milk

4 tablespoons (57 grams) unsalted butter

1 tablespoon (21 g) Wholesome Organic Fair Trade Raw + Unfiltered Organic Honey

1 teaspoon (4 g) fine sea salt

1 ½ cups (180 grams) bread flour (or all purpose flour)

5 large (280 grams) eggs (have 1-2 extra eggs on hand)

Egg wash, as needed for finishing (1 large egg + 1 tablespoon water mixed to combine)

Wholesome Organic Fair Trade Powdered Sugar, as needed for finishing (optional)

1. Make the Honey Pastry Cream Filling: in a medium pot, whisk the cold milk and cornstarch until well combined. Add the honey and salt and mix to combine. Heat this mixture over medium heat until it is warm and steamy - it doesn’t even need to simmer.

2. While the milk heats, whisk the egg yolks in a medium heat-safe bowl. Add about half of the warm milk to the bowl and whisk well to combine.

3. Return this mixture to the pot with the rest of the milk and honey and heat over medium-low heat, stirring constantly, until the mixture thickens and fat bubbles begin to break the surface of the custard. 3-5 minutes.

4. Remove the pot from the heat, and stir in the butter and vanilla until well combined. Strain the custard through a strainer into a medium bowl, cover the surface directly with plastic wrap, and refrigerate until well-chilled, at least 2 hours and up to 2 days.

5. Make the cream puffs: in a medium pot, bring the water, milk, and butter to boil over medium heat. Add the flour to the boiling liquid all at once, stirring constantly with a silicone spatula or wooden spoon. 

6. Reduce the heat to low, and continue to cook, stirring constantly, until the mixture becomes a slightly sticky paste - it should form a ball around the spatula/spoon as you stir. There should also be a visible film of starch on the bottom of the pan - this should take 2-3 minutes.

7. Transfer to the bowl of an electric mixer fitted with the paddle attachment (see note to use a hand mixer or mix by hand). Mix on low speed for 1 minute to cool the mixture slightly.

8. Whisk the eggs together in a large liquid measuring cup. With the mixer running on medium speed, add the eggs in slow, steady stream and continue mixing until fully incorporated 4-6 minutes. 

9. Test the consistency of the batter by dipping the paddle into the batter and lifting it up. The batter should form a V shape that eventually breaks away from the batter in the bowl. If the dough is too stiff or pulls away too quickly, you need to add more eggs. Add the extra egg in a slow, steady stream to loosen the consistency. 

10. Line a baking sheet with parchment paper (it’s ok to divide the puffs between two lined trays if you prefer. Place the pate a choux in a pastry bag fitted  with a large round tip. If desired, pipe a small amount of pate a choux at the corners of the parchment paper to help keep it in place while you work.

11. Hold the pastry bag straight up and down above one of the baking sheets and pipe 2 inch mounds of pate a choux onto the baking sheet, spaced at least 1 inch apart, and staggering the rows as you pipe. As each round nears the correct size, release the pressure on the bag and use a quick flick of the wrist to help break the connection between the dough and the pastry tip.

12. Use a fingertip dipped in cool water to smooth the edge where you finished piping, if desired. Let the puffs sit at room temperature for 15-30 minutes. 

13. Preheat the oven to 375°F. Bake the cream puffs until the choux is golden brown and crisp, 35 to 40 minutes. Cool the puffs completely.

14. When you remove the choux from the oven, immediately use a paring knife to poke a small vent into the side of the eclairs to allow steam to escape (this will help to keep them crisp). Cool completely. 

15. Transfer the chilled pastry cream to a pastry bag fitted with a large round or Bismarck pastry tip. 

16. Insert the tip into the base of the cooled puffs and fill with diplomat cream until they feel heavy and full. Repeat with the remaining puffs. Keep chilled until ready to serve, and serve within 8 hours. 

Note:

-To mix with a hand mixer: transfer the mixture to a heat safe bowl in step 3, then use a hand mixer to incorporate the eggs.

-To mix by hand: transfer the mixture to a heat safe bowl in step 3, then use a hand mixer to incorporate the eggs.

Erin McDowell Comments
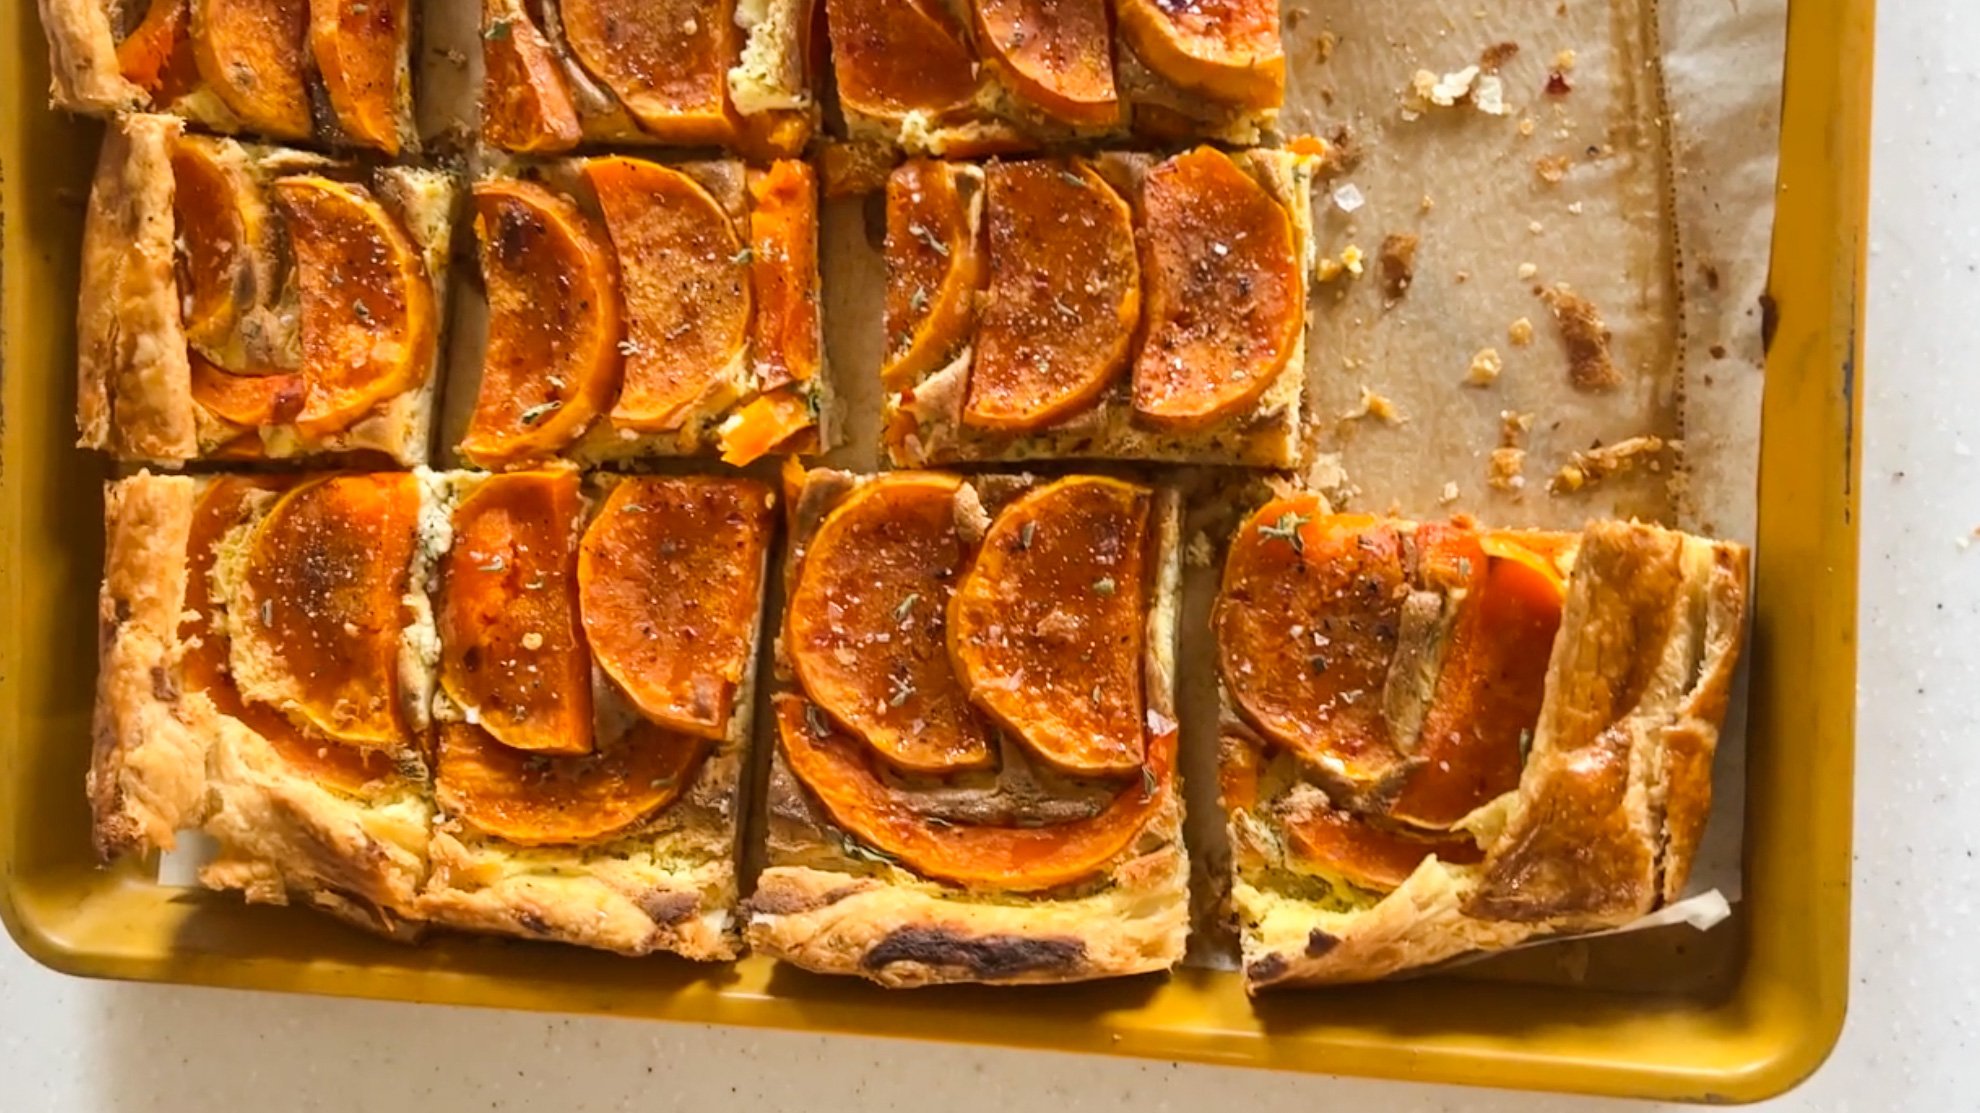
Flaky Butternut Squash Galette

A simple fall bake that still feels fancy. Delicious served warm or at room temperature - I love mine topped with hot honey, flaky salt, and sage.

Serves 6-8


Roasted Squash

1 small butternut squash (about 1 1/2 pounds), peeled, halved and seeded

2 tablespoons extra virgin olive oil

kosher salt and freshly ground pepper

8-10 fresh sage leaves

2 cloves garlic (whole cloves in the skin - do not peel)

Galette

8 ounces cream cheese (flavored cream cheese like scallion or chive works great here)

8 ounces ricotta cheese

1/2 teaspoon dried oregano

1 large egg

1/2 teaspoon kosher salt

1/2 teaspoon freshly ground black pepper

1 recipe Rough Puff Pastry, prepared and chilled for at least 30 minutes (or 16 ounces frozen puff pastry, thawed)

egg wash, as needed for finishing

hot honey, as needed for finishing (or honey + chile flakes - optional)

flaky salt, as needed for finishing

1 tablespoon finely chopped fresh sage

1. Preheat the oven to 400°F/205°C with the oven rack in the center.

2. Roast the squash: slice the squash into 1/2 inch/1 cm thick slices, and arrange in a single layer on a baking sheet. Drizzle with the olive oil, season with salt and pepper, and top with the sage leaves. Roast the squash until just-tender, 20 minutes. Cool completely.

3. Make the galette: in the bowl of an electric mixer fitted with the whip attachment, whip the cream cheese for 2 minutes on medium speed. Add the ricotta and whip for 3 minutes more. Scrape the bowl well, and add the crisp sage leaves from when you roasted the squash - use your fingers to crush them into the mixer bowl. Squeeze the garlic from the skins into the bowl too, and add the oregano, egg, salt, and pepper and mix on medium speed to combine. Set aside.

4. On a lightly floured surface, roll out the puff pastry into a large rectangle (about the size of a half baking sheet - 13 x 18 inches / 33 x 46 cm). Use the rolling pin to gently transfer the pastry to a parchment-lined baking sheet, unfurling the dough, centered on the baking sheet. It’s ok if it’s a little too big at this stage, you’ll eventually fold the edges over!

5. Spoon the cream cheese mixture into the center and spread into an even layer, leaving about 1 1/2 inches / 4 cm uncovered all the way around the outside edge. Arrange in an even layer on top (no need to be this precious, but I like to place the pieces that are more crescent shaped (from where the seeds were removed) around the outside edge, and the more half-moon pieces towards the center in rows).

6. Fold the uncovered edges up over themselves, and use your thumbs to firmly press as the edges to make sure they are well sealed. Egg wash the outside edge, and transfer the galette to the oven. Bake until the galette is deeply golden brown and slides back and forth slightly when you gently shake the baking sheet, 35-45 minutes.

7. While the galette is still warm, drizzle with hot honey, and garnish with flaky salt and sage. Serve warm or at room temperature.

Erin McDowell Comments
Toasted Tillamook Cheddar Burger Buns

For the the cheesiest burger, don’t just add cheese to the meat, add it to the bun, too! These homemade buns are huge and pillowy soft inside - but boast an extremely addictive toasted cheddar “crust” on the outside. Get ready for your best ever burger.

Makes 8 buns


6 cups (720 g) all purpose flour

3 tablespoons (36 g) granulated sugar

2 teaspoons (6 g) instant yeast

1 ½ teaspoons (7 g) fine sea salt

6 tablespoons (85 g) unsalted butter

12 ounces (349 g) evaporated milk

1 cup (230 g) warm water (about 100°F)

2 large (113 g) eggs, at room temperature

8 slices (8 ounces / 226 g) Tillamook Sharp Cheddar


1. In the bowl of an electric mixer fitted with the dough hook attachment, mix the flour, granulated sugar, yeast, and salt to combine.

2. Add the butter, evaporated milk, water, and eggs, and mix on low speed for 3 minutes, until a shaggy dough forms. Raise the speed to medium and mix for 2 minutes more, until it is fairly smooth.

3. Transfer to a lightly greased bowl, and cover with plastic wrap. Refrigerate for 8-10 hours (overnight).

4. Bring the dough to room temperature for 30 minutes, then divide into 8 even pieces. Form each piece of dough into a round, and transfer to a parchment lined baking sheet, staggering the rows of buns to allow them room to rise.

5. Cover the buns with a clean kitchen towel, and let rise until noticeably puffy, 45 minutes-1 hour. 

6. Towards the end of rise time, preheat the oven to 375°F. 

7. Bake the buns for 10-12 minutes, until they are just starting to brown on the top. Remove the buns from the oven, and place a slice of cheddar on each bun. 

8. Return to the oven and bake until the cheese is bubbly and crisp, and the buns are golden brown, 15-20 minutes more. Cool completely before slicing in half and filling with your favorite burgers and toppings. 

Erin McDowellComment
Pumpkin Galette

Pumpkin Galette

I thank Kristen Miglore and her Genius column for introducing me to Meta Given’s technique for reducing the moisture in canned pumpkin. This makes a thicker pumpkin puree that’s ideal for a less custardy, more purely pumpkin-y sort of filling in this double-crusted galette. While you can make it in any shape, it’s particularly autumnal fun to freehand it into a pumpkin shape (+ even the wonkiest pumpkin is a cute pumpkin)!

Makes one large pumpkin about 12 in / 30 cm wide


425 g / one 15-ounce can pumpkin puree

159 g / ¾ cup light brown sugar

14 g / 1 tablespoon unsalted butter

5 g / 1 teaspoon vanilla

7 g / 1 tablespoon ground cinnamon

4 g / 1 1/2 teaspoons ground ginger

¼ teaspoon freshly grated nutmeg

1 g / ¼ teaspoon fine sea salt

1 recipe Rough Puff Pastry, prepared, divided evenly in half, and chilled (recipe inside The Book on Pie or Food52)

64 g / 3 large egg yolks

egg wash, as needed for finishing  


1. Make the filling: place the pumpkin puree in a medium pot. Cook over medium-low heat, stirring frequently, until it appears dryer and darker in color, 12-15 minutes.

2. Transfer to a medium bowl and whisk in the sugar, butter, vanilla, cinnamon, ginger, nutmeg, and salt and whisk well to combine. Cool to room temperature.

3. While the mixture cools, draw a pumpkin template on a piece of parchment paper (I just freehand it with a pencil as a slightly bottom heavy oblong shape with a little stem up top). Make the widest pat of the pumpkin about 12 in / 30 cm wide, it should be about 9 in / 23 cm tall (the stem can go up a little taller). Cut the stencil out to use as a guide.

4. On a lightly floured surface, roll out half of the puff pastry to just larger than the stencil. Dock the pastry all over with a fork. Use the rolling pin to gently transfer the dough to a parchment lined baking sheet. Lay the stencil on top of the dough and use a paring knife to cut around it. Remove the excess dough. Place a piece of parchment on top of the dough.

5. Roll out the second piece of puff pastry to just larger than the stencil – don’t dock this portion of dough. Use the rolling pin to gently transfer the dough to a parchment lined baking sheet. Lay the stencil on top of the dough and use a paring knife to cut around it. Remove the excess dough. Place a piece of parchment on top of the dough. Cover the top dough with plastic wrap and refrigerate.

6. Whisk the egg yolks into the cooled pumpkin mixture and whisk well until smooth (the mixture should still be quite thick).

7. Remove the dough from the refrigerator. Pull the parchment holding the plastic wrap covered piece of dough to the side of your work surface, leaving the uncovered pumpkin shape on the baking sheet. Spoon the pumpkin filling into the center of the dough, and spread evenly over the dough, leaving the outer 1 in / 2 cm (and the stem portion) uncovered.

8. Brush the exposed dough with egg wash, then gently unfurl the undocked portion of dough over the filling, stretching the top portion slightly as needed to match it up to the edges of the base. Crimp the dough all the way around with a fork, pressing firmly to seal the top and bottom together.

9. Preheat the oven to 400°F/204°C with a rack toward the center of the oven, (preferably with a baking steel or stone on it).

10. Egg wash the surface of the dough (leave the crimped edges un-touched). Use the tip of a paring knife to gently score the surface of the dough (see page xxx) in curved shapes from the stem end to the base, imitating the ridges of a pumpkin (I place mine about 1 ½ in / 4 cm apart). If desired, you can add alternate / additional decorative score marks to create different effects (see note).

11. Transfer the pastry to the oven and bake until deeply golden brown, 40-45 minutes. If portions of the pastry are browning more quickly than others, cover them with aluminum foil for the duration of baking. Cool completely before slicing and serving.


Note:

Get creative with your score marks. You can define the stem by applying diagonal score marks close together. The same technique works between the score marks applied in step 8. You can alternate the direction of the diagonal marks between each of the initial score marks to help add dimension. Or, you can just add cinnamon sugar or turbinado to the top of the whole pie!

Erin McDowellComment
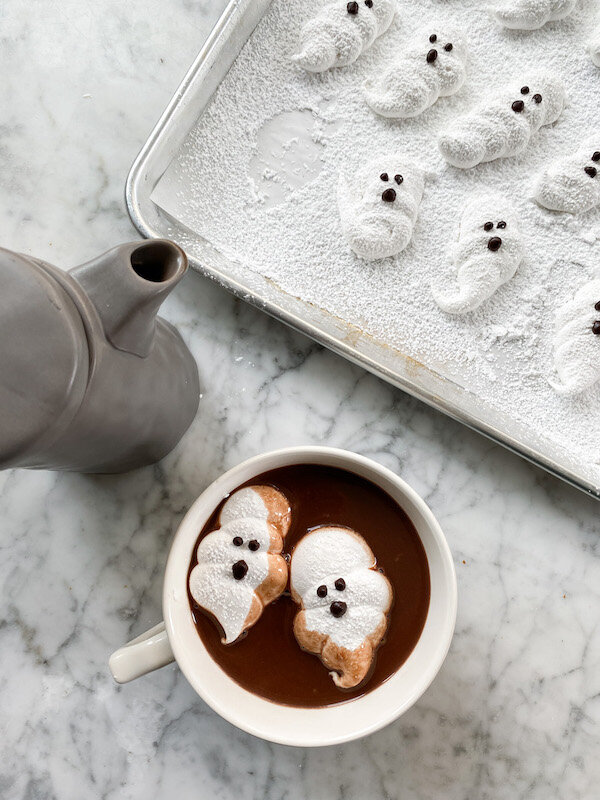
Creamiest Cocoa with Ghost-Mallows!
IMG_7911 2.JPG

Creamiest Cocoa with Ghost-Mallows

Makes about 30 ghost-mallows + enough cocoa for about 8 servings

Ghost Marshmallows

powdered sugar, as needed for dusting 

120 g / ½ cup cool water, divided

7 g / 2 ½ teaspoons powdered unflavored gelatin

198 g / 1 cup granulated sugar

85 g / ¼ cup corn syrup

7 g / 1 ½ teaspoons vanilla extract 

28 g / 1 ounce bittersweet chocolate, melted

Rich and Creamy Cocoa

690 g / 3 cups whole milk

188 g / ½ cup heavy cream 

21 g / 3 tablespoons cocoa powder (I especially love black cocoa powder here!)

24 g / 2 tablespoons granulated sugar

pinch fine sea salt

285 g / 10 ounces chopped milk chocolate (or chips)

113 g / 4 ounces chopped white chocolate (or chips)

1. Make the marshmallows: place a medium sieve over a medium bowl, and scoop a generous amount of powdered sugar into it. Line a baking sheet with parchment paper, then sift an even layer of powdered sugar over the surface. Prepare an electric stand mixer fitted with the whip attachment. Lightly grease a spatula with nonstick spray. Prepare a pastry bag by fitting it with a medium round tip (such as Ateco #7). 

2. Pour 60 g / ¼ cup of the water into a shallow bowl, and sprinkle the gelatin over it. Let the gelatin bloom for 5 minutes.

3. In a small pot, combine the sugar, corn syrup, and remaining 60 g / ¼ cup water. Attach a candy thermometer to the side of the pot. Bring the mixture to a boil over medium heat. While it comes to a simmer, stir it with a silicone spatula to help combine the mixture as it initially heats. As soon as you see bubbles, stop stirring.

4. If any sugar has washed up on the sides of the pot during stirring, use a pastry brush dipped in cool water to brush it away and dissolve it. Continue to cook until the mixture reaches 240°F/115°C on the thermometer. Remove the pot from the heat.

5. Transfer the hot sugar syrup to the prepared mixer bowl, add the vanilla extract, and start whipping on low speed. Add the bloomed gelatin and mix to fully combine. Gradually raise the mixer’s speed to high and whip until the marshmallow is white, fluffy, and holding medium peaks, 8-9 minutes.

6. Use the greased spatula to transfer the marshmallow to the prepared pastry bag. Pipe the marshmallow into rough ghost shapes by piping a large circle, then zig-zagging the tip back and forth to make the ghost’s “tail”. The marshmallows can be any size you like - but make sure they’ll fit easily into your cocoa mug.

7. Sift a light layer of powdered sugar over the marshmallows, and let set at room temperature until firm, at least 30 minutes. Use a toothpick to apply dark chocolate eyes and mouths to the round “faces” of set marshmallows.

8. Make the cocoa: in a medium pot, bring the milk to a simmer over medium heat. While it heats, whisk the cocoa powder, sugar, and salt together in a small bowl. 

9. When the milk simmers, whisk in the cocoa mixture until well combined. Add the milk and white chocolate and continue to cook, whisking constantly until the chocolate completely melts. If it doesn’t look smooth, whisk more vigorously to help it come together. 

10. Ladle the finished cocoa into mugs, and top with the ghost-mallows. Serve immediately. 

Erin McDowell Comments